More pages: 1 2 3 4 5 6 7 ...
11 ...
12
Framework 4 (Last updated: October 25, 2019)Framework 3 (Last updated: February 6, 2017)Framework 2 (Last updated: October 8, 2006)Framework (Last updated: October 8, 2006)Libraries (Last updated: September 16, 2004)Really old framework (Last updated: September 16, 2004)
Volume roads
Monday, October 4, 2010 | Permalink
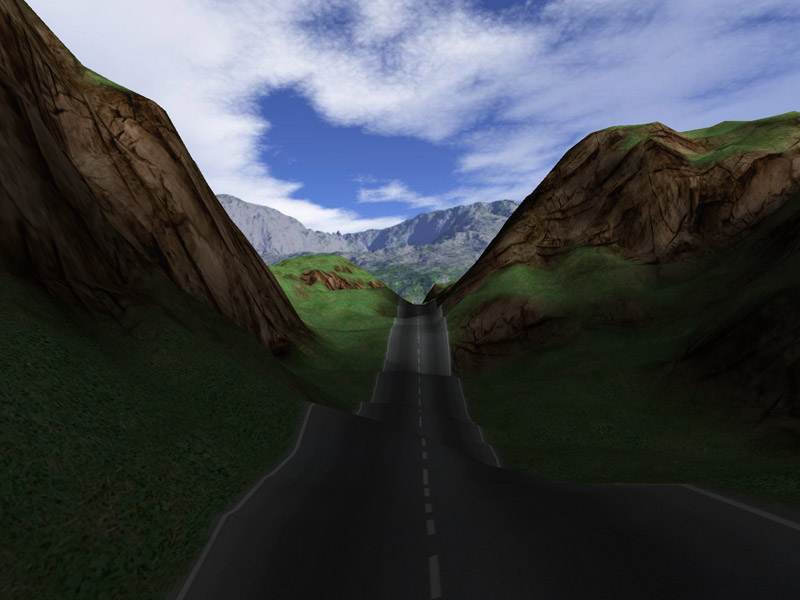
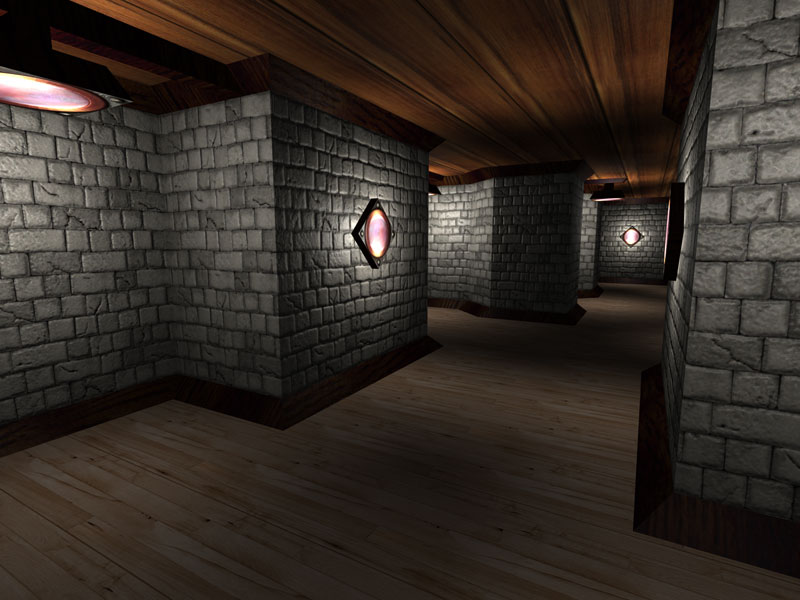
Rendering roads is usually done by first smoothing the terrain under the road and then rendering some simple 2D geometry on top of the terrain. This approach commonly causes issues with depth fighting though. A liberal amount of depth bias that's usually needed to solve this unfortunately also usually puts the road in front of the terrain at some places and/or clips through wheels on vehicles and other artifacts. Another solution is to put the road geometry somewhat above the terrain. This unfortunately causes visible parallax against the terrain.
This demo solves these problems by applying a technique similar to the Volume Decals demo. A road segment is rendered as a box encapsulating the terrain. The depth buffer is sampled and back-projected into the local space of the box, and the .xz coordinates are used as texture coordinates. Unlike in the decal case the road texture is tiled in one direction, so we can't just pad it with zero alpha or use the texture border color to handle the "outside the texture" case. This is solved by first cutting out the affected pixels with a stencil pass. When rendering the road the stencil bits are then reset to zero.
Road textures are typically relatively high resolution and needs mipmapping, however, when computing texture coordinates from the depth buffer we get discontinuities wherever there was a geometric edge between a triangle and the background. This causes artifacts in 2x2 pixel blocks as the gradients get messed up. In the Volume Decals demo this was solved by simply not using mipmaps, which works on the fairly low-resolution textures generally used in that technique. That's not going to work with roads though. So for this demo I sample neighbor depths. For pixels belonging to the same primitive the deltas should be constant, so whenever a delta is larger in one direction, it means we crossed over to a background pixel there. So I compare which of left and right pixel has the smallest difference in depth, and compute the texture coordinate for that pixel as well. The same is done vertically. This gives me the two gradients and I can do a SampleGrad() lookup and get the right mipmap even at border pixels. The benefit of computing correct gradients is visible in these screenshots:
With:
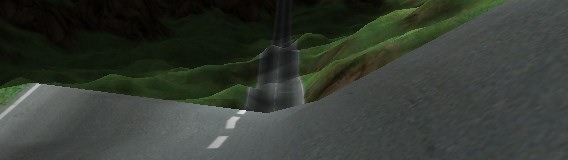
Without:
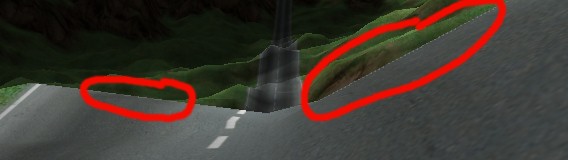
With a less uniformly colored texture the artifacts would be even more obvious.
Since this technique uses the depth buffer the roads are smeared on top of the underlying geometry and no biases of any kind are necessary. This means it will work even with not so smooth geometry, as evident in the demo, although in practice you obviously still normally want to smooth the geometry under the road.
The demo allows you to place roads dynamically over the terrain using the left mouse button, and clear all with right button.
This demo should work on Radeon HD 2000 series and GeForce 8000 series and up.
Volume decals
Sunday, October 4, 2009 | Permalink
This demo illustrates a fairly simple technique for creating seamless decals on arbitrary geometry. This is done by rendering a convex volume (such as a sphere or a box) around the decal area. Using the screen position and the information in the depth buffer the local position within the decal volume is computed. This is then used as a texture coordinate into a volume texture containing the decal. To get unique looking decals a random rotation is applied on each individual decal volume.
The decal pass is rendered at the end of the g-buffer pass in a deferred renderer and simply alters the diffuse and specular intensity parts while leaving the normals unchanged. The lighting can then be done as usual.
This demo should run on Radeon HD 2000 series and up, as well as GeForce 8000 series and up.
Recursion
Saturday, February 28, 2009 | Permalink
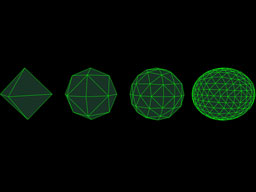
One of the least advertised features of shader model 4.0 is that temporaries are indexable. This means you can declare an array in your shader and arbitrarily read and write to it. This opens up for lots of interesting algorithm. What this demo does is to use this feature to do recursion. An array of temporaries is used to emulate a stack, together with an index that's used as the stack pointer. The actual algorithm implemented recursively here is perhaps not the most exciting, it's just a simple tessellation of a sphere. More interesting is that fact that it's possible.

A couple of notes about the implementation. HLSL does not support recursive function calls. If it did, the code would have looked very straightforward. In fact, HLSL hardly ever creates function calls at all. The only way I've found to convince it to do so is to use a switch case with the [call] directive. And even in that case it only works from main(), not from any subroutine. So what I had to do was to emulate the whole function calling mechanism manually in a while-loop.
The end result is a shader that does tessellation up to three levels. It could've gone much higher if geometry shaders didn't have an output limitation of 1024 floats. The demo renders the base geometry with tessellation levels 0, 1, 2 and 3.
It should be noted that while indexing into temporaries is cool and sometimes also convenient it's a feature that should be used sparingly because the performance implications could be very nasty. One reason is that it's harder for the compiler to optimize since indexed reads and writes are hard to analyze. The other reason is that the number of temporaries your shader needs could go up dramatically, which reduces your GPU's ability to hide latencies. Even a small array could easily double or triple the temporary count your shader needs.
One cool thing about recursion though is that you don't need a very deep stack to get a lot of stuff done. In this demo I only need a stack of 12 registers. The shader as a whole needs 25 registers according to GPU Shader Analyzer. One could have implemented the same algorithm in a flat matter where it would tessellate the results from the previous pass in a loop. However, this would require that the array is large enough to fit the entire results of a pass, which in this demo would've meant 192 registers.
This demo should run on Radeon HD 2000 series and above and GeForce 8000 series and above.
Deferred shading 2
Tuesday, October 21, 2008 | Permalink
While my previous deferred shading demo showed deferred shading at its best using an extreme amount of lights this demo shows a more real-world scenario. Hence it's also implemented differently.
The main bullet point of this demo versus the previous one is that multisampling is supported. In D3D10 we have full access to the samples in multisampled surfaces, and in D3D10.1 this is extended to depth buffer as well; however, it's still tricky to make it work and perform well. Since the geometry for the lighting (which in this demo is a sphere) is separated from the underlying buffers we don't automatically get any information about which pixels belong to edges and need to be evaluated for all the samples and which pixels only need a single sample evaluated. This demo separates these two cases using a stencil mask.
First the scene texture, normal and depth is rendered into multisampled render targets. Pixels that are partly covered are detected using centroid sampling on the SV_Position register. If the sampling position shifted from the center, it's an edge pixel. This is written to the alpha channel.
An ambient lighting pass is then rendered as a fullscreen pass to the backbuffer (which is not multisampled) and the resolved edge flag comes out in the alpha channel.
The backbuffer is then sampled as a texture in a pass to create a stencil mask from the alpha channel by writing 1 to stencil and discarding fragments where alpha is zero.
The lighting is then rendered as two passes using the stencil mask to select pixels. One pass with a simple shader that only uses the first sample to compute the lighting, which is used for the vast majority of the pixels, and one that computes the lighting for all samples, which is used for edge pixels.
Using keys F5-F7 you can compare this technique (F5) to the naive approach of evaluating the samples on all pixels (F6) and that of using single sample shader on all pixels (F7). On F8 you can see what's in the stencil mask.
This demo should run on the Radeon HD 3000 series and up. Since this demo uses Direct3D 10.1 you need to have Windows Vista SP1 installed.
Interior Mapping
Sunday, August 3, 2008 | Permalink
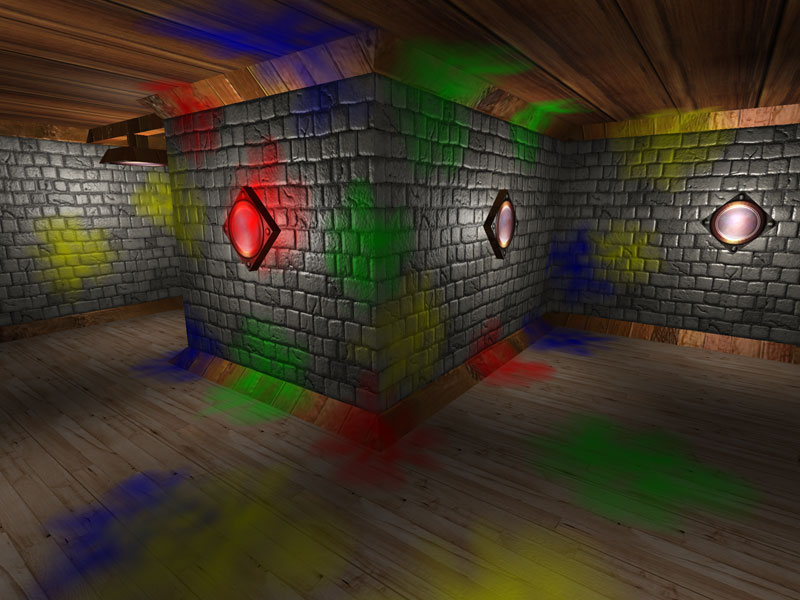
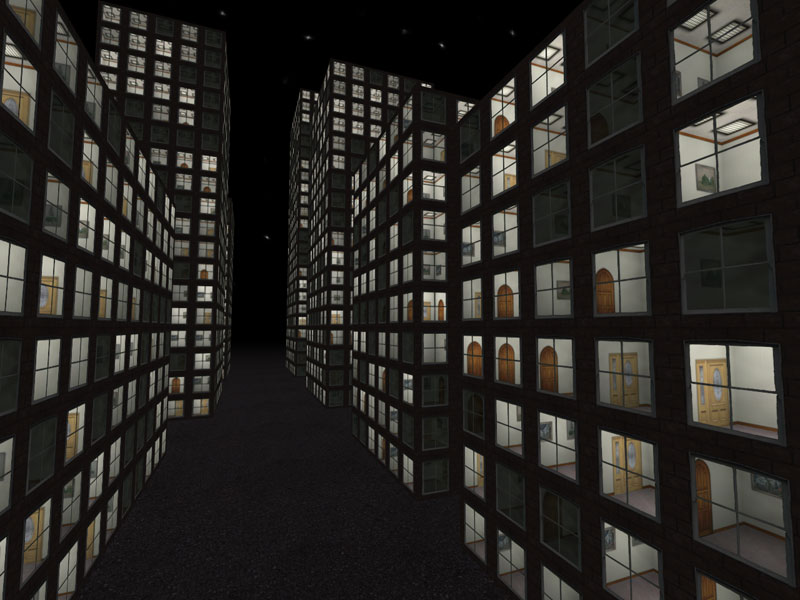
Interior mapping is a technique that renders the interior of buildings without requiring additional geometry. Everything is done in the pixel shader. The advantage is that when you're rendering large cities you can draw all those buildings as simple boxes.
The idea was to my knowledge first proposed
here.
My implementation is somewhat different. To begin with, I represent the room with a cubemap. In DX10 this has the advantage that it'll filter across cubemap faces, making the edge between walls/floor/ceiling antialiased, unlike the original implementation. It also means you only need one texture lookup, rather than separate for floor planes, walls and ceiling. Finally, with cubemap arrays in D3D10.1 it's also possible to have several different types of rooms which can be selected by the shader. I have implemented this, although due to lack of artwork (it was time consuming enough to produce a single room) I'm simply shuffling the walls around in 8 different combinations.
This demo should run on the Radeon HD 3000 series and up. Since this demo uses Direct3D 10.1 you need to have Windows Vista SP1 installed.
GPU Texture Compression 2
Sunday, July 6, 2008 | Permalink
This demo is very similar to the first GPU Texture Compression demo. The difference is that this demo compresses to DXT1 or BC1 as it's called in DX10. BC1 textures have a wider range of uses than BC4 because they are color rather than grayscale, but on the other hand they are more complex to compress to. This demo implements a fairly quick and quite decent compression which is good enough for realtime use. The tricky part in DXT1 is to choose the two base colors for a tile. The algorithm basically looks for which channel of RGB has the greatest contrast and uses that as the base. Then it does a least squares fitting of the other two channels against the base channel to find the most suitable values. Once the base colors are chosen it loops over the 16 colors and matches each color to whichever of the two base colors or the two interpolated colors is the closest.
In addition this demo has a more trivial implementation which simply uses the maximum and minimum of all channels as the base colors. It produces surprisingly useful results. I would have expected nasty discolorations, but this appears to not be nearly as much of a problem as one might have thought. Quality is somewhat lower than the above method though, but on the other hand it's somewhat faster as well. You can toggle between the two with F6.
This demo should run on the Radeon HD 3000 series and up. Since this demo uses Direct3D 10.1 you need to have Windows Vista SP1 installed.
GPU Texture Compression
Saturday, April 12, 2008 | Permalink
Compressed textures is one of the most important features and have saved us a lot of memory and bandwidth over the years. However, its use has long been practically limited to static textures only because the compression is slow and there's no compression hardware, just decompression. Even with a simple compression algorithm the bottleneck of transferring GPU data to the CPU for compression and then transferring compressed data back makes it impractical for most uses to compress render targets.
Direct3D 10.1 introduced the ability to do a copy to block compressed formats from integer formats of the same size as a compressed block. For instance, a 256x256 RG32_UINT texture can be copied into a 1024x1024 BC4 texture. This allows an application to write a compression shader rendering to an integer render target and then copying the results into a compressed texture and thus keeping the entire texture compression process on the GPU.
This demo compresses a texture (although static) on the GPU to a BC4 format. Because this is a single channel texture I also use the Gather texture fetch method (AKA Fetch4) that was also introduced in Direct3D 10.1 to reduce the number of texture fetches from 16 to 4. The shader is surprisingly short at 49 ALU instructions on a HD 3870, which for a 4x4 block is barely over 3 instructions per pixel.
For render targets that stay the same across many frames it's likely that compressing it will improve performance. Even compressing every frame is definitively practical, although whether you get a performance increase or not depends on how many times you read it for each compression cycle. Another interesting use is to avoid the harddrive bottleneck when reading textures from disk, which you can do by storing textures as jpegs on disk and recompressing to a GPU format on the fly. Having it on the GPU ensures the compression process will be fast, although an implementation would be likely to do the jpeg decompression on the CPU.
This demo should run on the Radeon HD 3000 series. Since this demo uses Direct3D 10.1 you need to have Windows Vista SP1 installed.
Custom resolve
Thursday, March 27, 2008 | Permalink
One of the more interesting features of D3D10 is access to individual samples in a multisampled texture. This has a lot of uses and one of the most obvious is to implement a custom resolve of the multisampled buffer. This allows an application to combine the samples in the buffer in any way it likes in a shader. One reason an application may want to do that is because of HDR rendering. Any decent tonemap operator will have a non-linear response, which makes regular resolves that average samples produce low quality antialiasing. In fact, even with just relatively modest contrast ratios the effect of antialiasing will diminish or even disappear. The solution to this problem is to make a custom resolve shader that tonemaps all samples individually and average the results after tonemapping, rather than before, which will be the case with a regular resolve.
For a more in-depth explanation of this technique check out my article "Post-tonemapping resolve for high quality HDR antialiasing in D3D10" in
ShaderX6.
This demo should run on Radeon HD 2000 series and above and GeForce 8000 series and above.
More pages: 1 2 3 4 5 6 7 ...
11 ...
12


 Executable